Form Exchange Complete Workflow
Step-by-step guide for form exchange process
Form Exchange Complete Workflow
This guide walks through the complete process of updating form files in ERP Pro v9, from initial upload through deployment to production servers.
Step 1: Support Team - Generate Request Code and Upload to S3
Purpose: Provide secure, time-limited access to allow ERP Pro v9 software permission to upload the initial forms package to Amazon S3.
How to Generate:
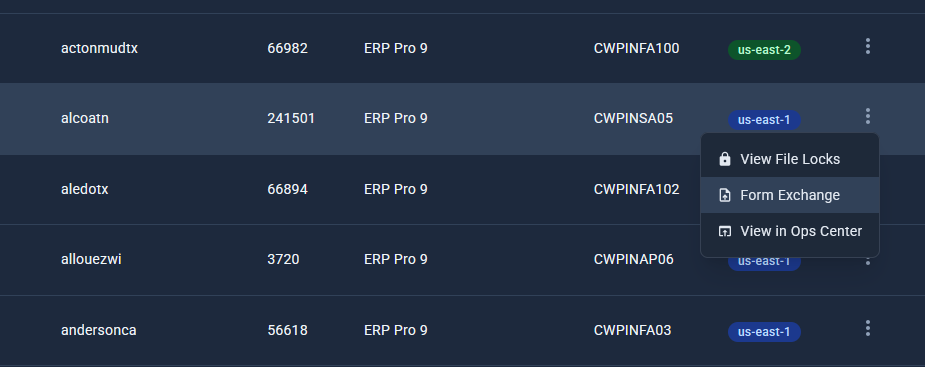
- Navigate to Product → ERP Pro → Client Operations
- Search/Find Client → Actions → Form Exchange
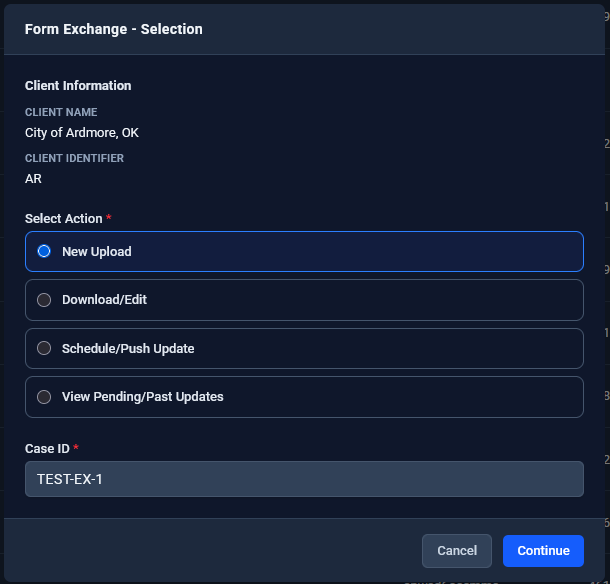
- In modal Enter Case ID → Select ‘New Upload’ → Continue
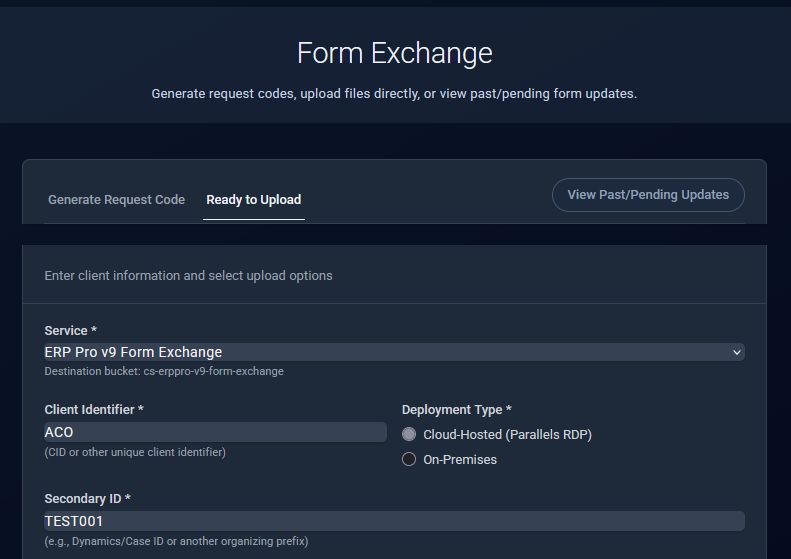
- Defaults to “Generate Request Code” tab
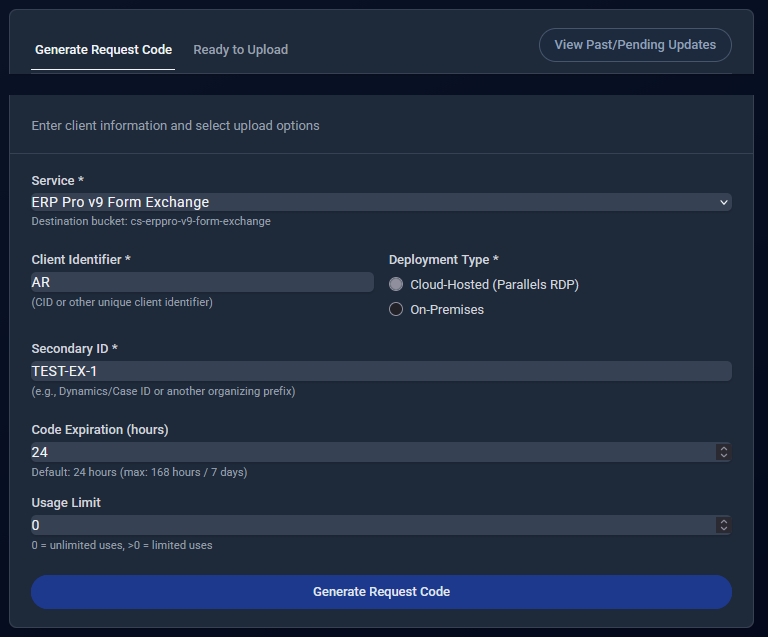
- Fill in the form:
- Service: Leave as “ERP Pro v9 Form Exchange”
- Client Identifier: Verify the client ID populated (e.g., “AB1”)
- Secondary ID (Case/Prefix): Verify the case ID is correct
- Set Code Expiration and/or Usage Limit as desired
- Click “Generate Request Code”
What You’ll See:
The system displays two pieces of information:
- Request Code: 8-character code (e.g.,
RC-2026-02-10-A3F9K2M7) - API Key: Long service key for authentication

What to Do Next:
- Copy both values (Request Code and API Key)
- Open ERP Pro v9 Forms Upload screen:
- Paste API Key and Request Code into the appropiate fields, along with the Dynamics Case ID
- Click Submit and verify the upload succeeds
- Notify Forms Dev via CRM that files are ready for download
-
Option 1: Uploading Forms File(s) to be Edited by Forms Developer (Typical)
-
Option 2: No Forms File(s) to Upload - Forms Developer will create New
Important Notes:
- Request codes expire after 24 hours by default
- Codes can be single-use or multi-use depending on configuration
- If the code expires, simply generate a new one
Step 2: Forms Dev - Download Forms Package for Editing
Purpose: Download the uploaded forms package to edit forms locally.
How to Download:
- Navigate to Product → ERP Pro → Client Operations
- Search/Find Client → Actions → Form Exchange
- In modal Enter Case ID → Select ‘Download/Edit’ → Continue
- Defaults to “Download Files” view
- Form automatically populates:
- Service: Leave as “ERP Pro v9 Form Exchange”
- Client Identifier: Verify the client ID populated (e.g., “AB1”)
- Secondary ID (Case/Prefix): Verify the case ID is correct
- Files at Source: The files at the source location should load automatically
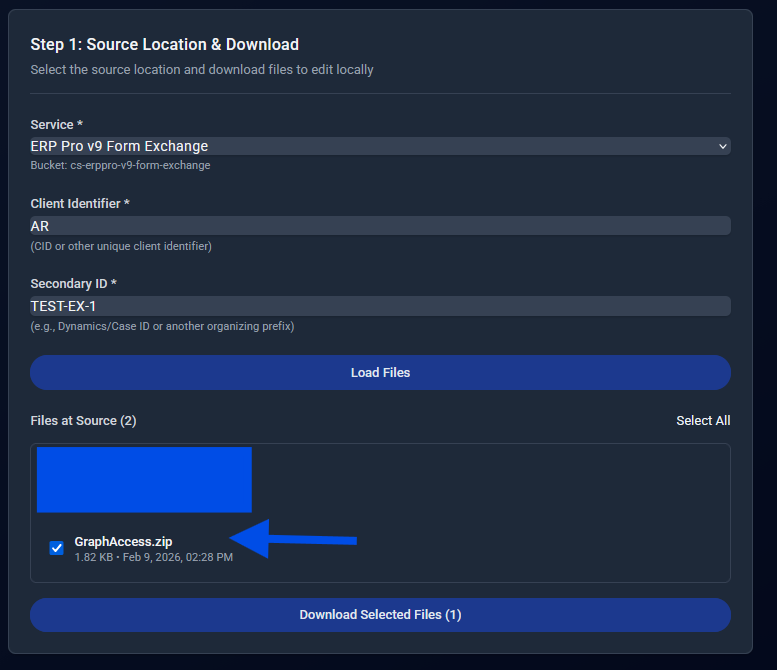
- Select File(s) and then Download Selected File(s)
- Save to your local machine for editing.
What You’ll See:
- Table showing all files in the selected sub-destination
- File names, sizes, upload dates
- Download buttons for each file

What to Do Next:
- Extract files locally
- Edit forms using your developer tools
- Test changes locally before uploading
Step 3: Forms Dev - Upload Edited Files (Ready to Deploy)
Purpose: Upload edited forms to the “DONE” location to signal they’re ready for production deployment.
How to Upload Edited Files:
- Navigate to Product → ERP Pro → Client Operations
- Search/Find Client → Actions → Form Exchange
- In modal Enter Case ID → Select ‘New Upload’ → Continue
- Select Ready to Upload tab at top
- Verify the form entries:
- Service: Leave as “ERP Pro v9 Form Exchange”
- Client Identifier: Verify the client ID populated (e.g., “AB1”)
- Secondary ID (Case/Prefix): Verify the case ID is correct
- File Version: Select Updated option (should be default)
- Select your edited forms package file(s)
- Click Continue to Sub-Destination Selection
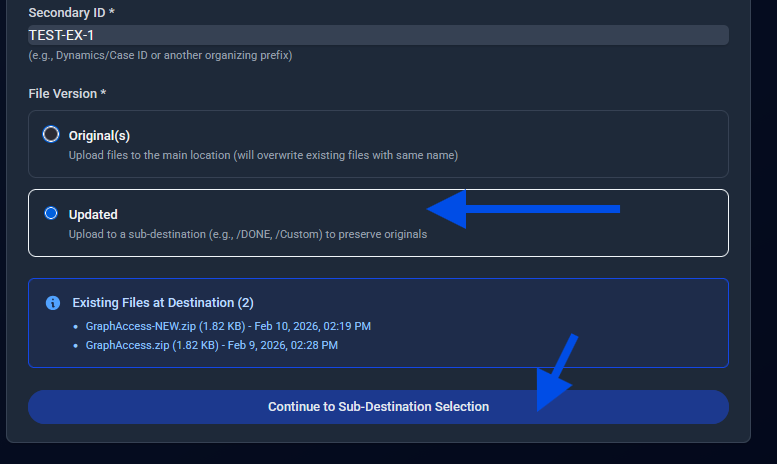
- Select sub-destination:
- /DONE - Standard location for completed files
- /[Today’s Date] - Date-stamped location
- /CUSTOM - Enter a custom location
- Browse to select the edited form package/files
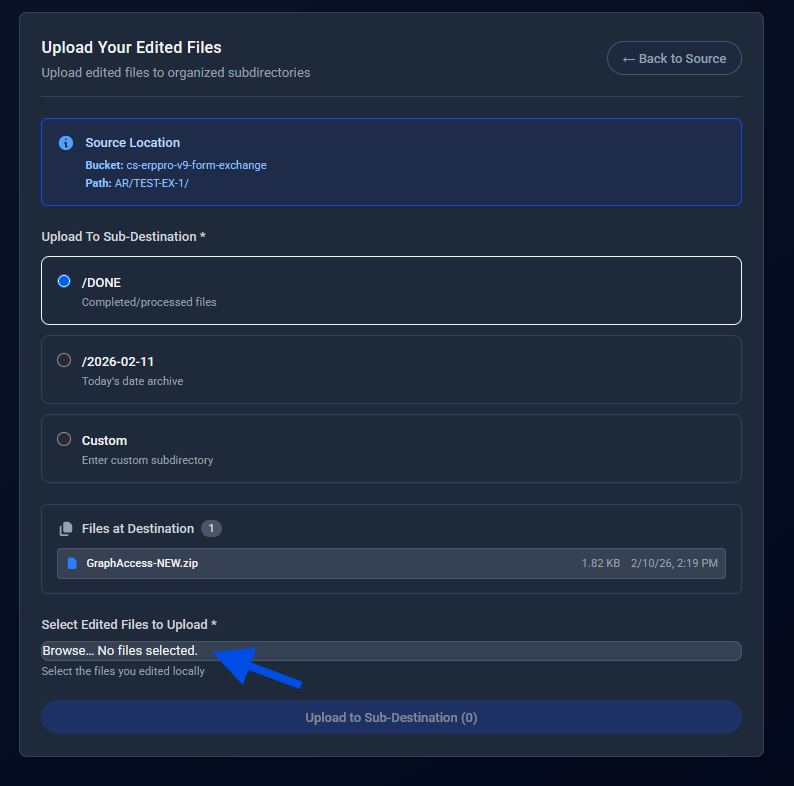
- Click Upload to Sub-Destination
What Happens:
- Files are uploaded to the specified sub-destination in the S3 bucket
- Files are marked as ready for deployment
- Notify Support Team via CRM that files are ready for deployment
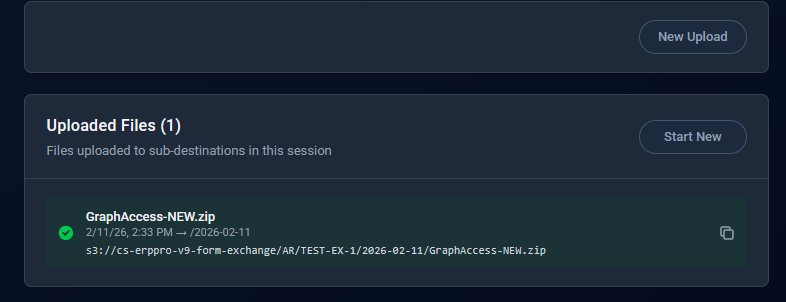
Important: Make sure to notify Support via CRM so they know the edited files are ready to deploy!
Step 4: Support Team - Schedule Deployment to Production
Purpose: Schedule automated deployment of the edited forms to the production ERP Pro server.
Prerequisites:
- Forms Dev has uploaded edited files to “DONE” destination
- Forms Dev has notified via CRM that files are ready
How to Schedule:
- Navigate to Product → ERP Pro → Client Operations
- Search/Find Client → Actions → Form Exchange
- In modal Enter Case ID → Select ‘Schedule/Push Update’ → Continue
- On next page, select the DONE location (or date-stamped location) to navigate to the Schedule Form
- On the next Review Files page, the available file(s) should be displayed
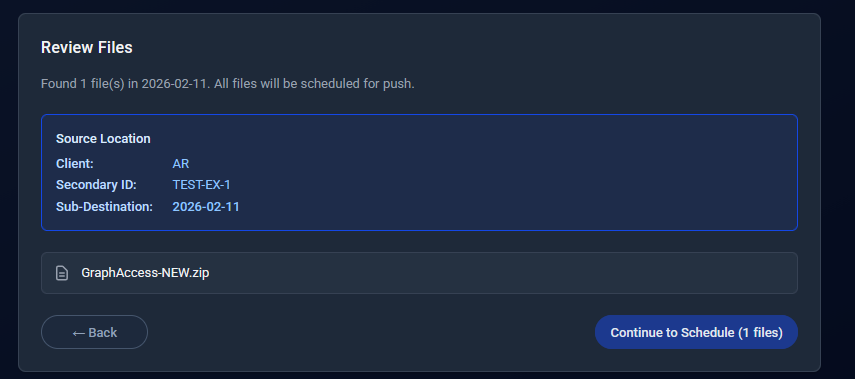
- Click Continue to Schedule (n Files) if everything looks as expected
Fill in the Schedule Form:
Source Information (pre-filled/read-only):
- Client Identifier: e.g., “AB1”
- Secondary ID: Dynamics Case ID
- Sub-Destination: Name of directory with “DONE” files
Batch Configuration:
- Enter a “Batch Label” - A descriptive name to describe this forms package/files (e.g., “February 2025 Invoice Forms Update”)
Destination Configuration:
- Destination Path: Should be pre-filled. Verify it looks correct, or make any necessary changes (e.g.,
D:\IMHS\AB1\FORMS\) - Host Name: Server name (e.g., “CWPINAP06”) - pre-filled
- Region: AWS region (e.g., “us-east-1”) - pre-filled
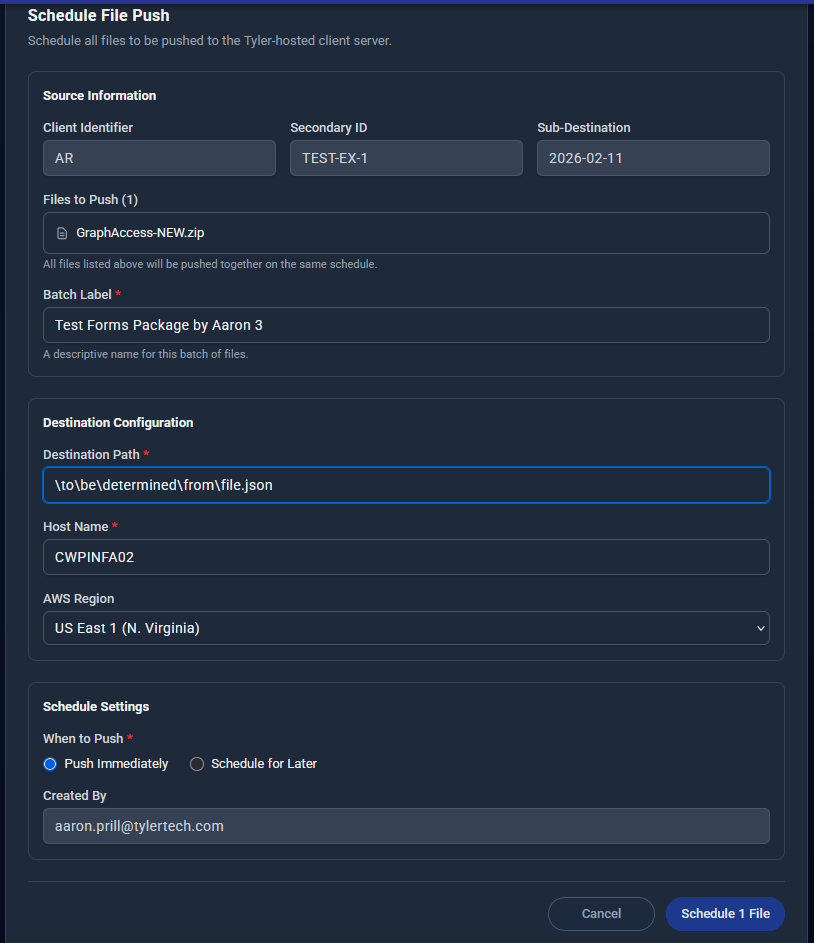
Schedule Settings:
- Select When to Push:
- Push Immediately: Deploys in ~5 minutes
- Schedule for Later: Specify exact date/time (e.g., during maintenance window)
Submit the Schedule:
- Review all information carefully
- Click “Schedule [n] File(s)”
- System creates deployment schedule(s)
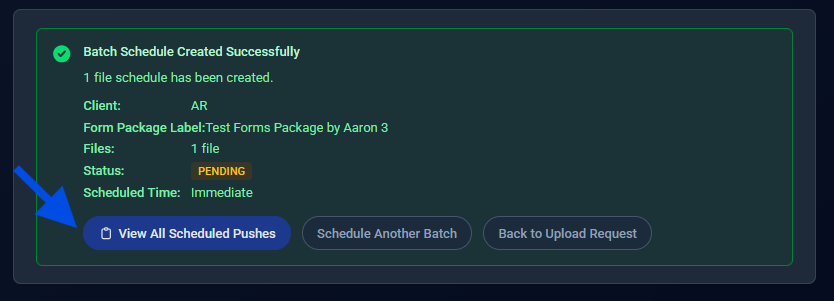
What Happens Next:
- Schedule(s) created with status PENDING
- System checks for pending schedules every 5 minutes
- At scheduled time (or immediately), deployment begins automatically
- Status changes: PENDING → IN_PROGRESS → COMPLETED (or FAILED)
Step 5: Monitor Updates
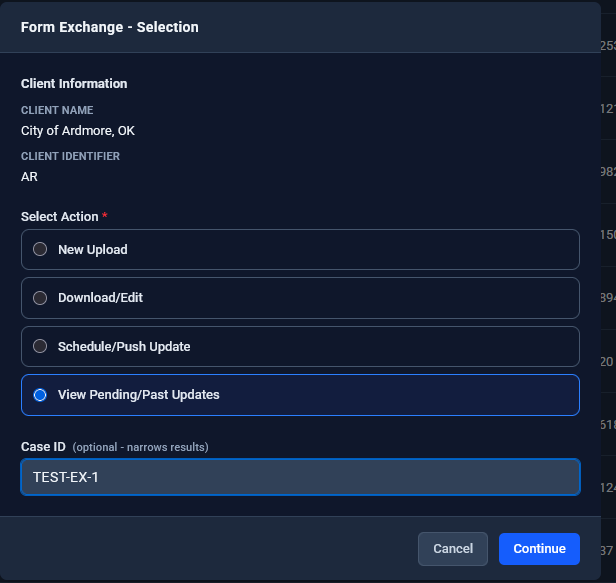
How to Check Status:
- Navigate to Product → ERP Pro → Client Operations
- Search/Find Client → Actions → Form Exchange
- In modal Enter Case ID → Select ‘View Pending/Past Updates’ → Continue
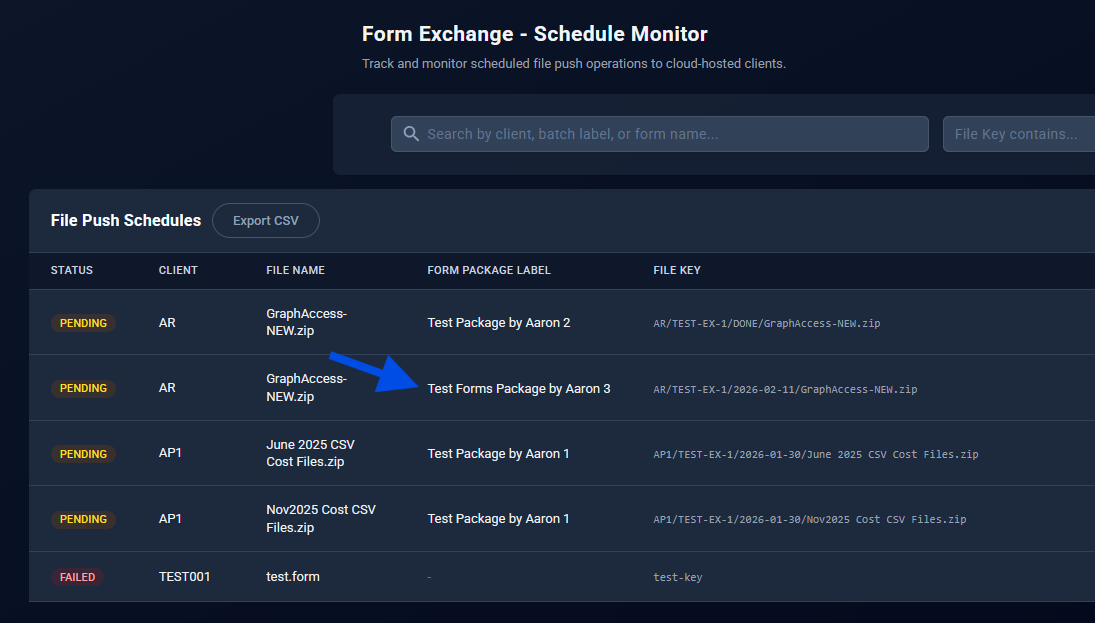
Schedule Statuses:
| Status | Meaning | What to Do |
|---|---|---|
| PENDING | Waiting for scheduled time | Wait for scheduled time to arrive |
| IN_PROGRESS | Currently deploying to server | Wait for completion (5-10 min) |
| COMPLETED | Successfully deployed | Verify with client |
| FAILED | Deployment error | Review error, fix issue, reschedule |
Automatic Execution:
- System checks for pending schedules every 5 minutes
- When scheduled time arrives, deployment starts automatically
- Uses AWS Systems Manager (SSM) to push files to server
- Status updates automatically as deployment progresses
If Deployment Fails:
- Click on the failed schedule to view error details
- Common issues:
- Server is offline or unreachable
- Destination path doesn’t exist
- Permission issues
- File not found in S3
- Fix the underlying issue
- Create a new schedule to retry
Complete Example Scenario
Scenario: Client AB1 needs form updates for case 991234ABC
Step 1 (Support Team)
Sarah (Support):
- Opens Cloudscape → Client Operations
- Finds Client AB1
- Actions → Form Exchange
- Enters Case ID: 991234ABC
- Selects “New Upload”
- Generates Request Code
- Pastes credentials into ERP Pro v9 Forms Upload screen
- Uploads forms package to S3
- Notifies Forms Dev team via CRM
Step 2 (Forms Dev)
John (Forms Dev):
- Receives CRM notification
- Opens Cloudscape → Client Operations
- Finds Client AB1 → Form Exchange
- Enters Case ID: 991234ABC
- Selects “Download/Edit”
- Downloads forms package
- Extracts and edits forms locally
- Tests changes on dev environment
Step 3 (Forms Dev)
John (Forms Dev):
- Returns to Cloudscape → Client Operations
- Client AB1 → Form Exchange
- Enters Case ID: 991234ABC
- Selects “New Upload”
- Switches to “Ready to Upload” tab
- Uploads edited package
- Selects “/DONE” as sub-destination
- Notifies Support via CRM that files are ready
Step 4a (Support Team)
Sarah (Support):
- Receives CRM notification
- Opens Cloudscape → Client Operations
- Client AB1 → Form Exchange
- Case ID: 991234ABC
- Selects “Schedule/Push Update”
- Selects DONE location
- Reviews files listed
- Fills in schedule:
- Batch Label: “AB1 Feb 2025 Invoice Forms”
- Destination verified:
D:\IMHS\AB1\FORMS\ - When: Tomorrow 2:00 AM (maintenance window)
- Submits schedule
- Notifies client of scheduled deployment time
Step 4b - 2:00 AM (Automated System)
System:
- Detects scheduled time arrived
- Retrieves files from S3 DONE location
- Connects to AB1 server via SSM
- Deploys files to
D:\IMHS\AB1\FORMS\ - Updates status to COMPLETED
Step 5 (Support Team)
Sarah (Support):
- Checks Form Exchange Schedules
- Filters by “AB1 Feb 2025 Invoice Forms”
- Confirms COMPLETED status
- Notifies client deployment successful
- Client tests and confirms forms working
Best Practices
For Support Team
Generating Credentials:
- Use descriptive case IDs from CRM/ticketing system
- Keep track of issued codes and their expiration
- Use appropriate expiration times (24hr default is usually sufficient)
- Communicate scheduled deployment times to clients in advance
Scheduling Deployments:
- Schedule during maintenance windows when possible
- Use descriptive batch labels (include client, date, purpose)
- Verify server information before scheduling
- Double-check destination paths (no undo!)
- Coordinate with client before scheduling
Communication:
- Notify Forms Dev when files are uploaded and ready for download
- Notify clients before scheduled deployments
- Confirm deployment success with clients after completion
For Forms Development
Downloading Files:
- Verify you’re downloading from the correct client and case ID
- Keep local copies of original files for reference
- Document what changes you’re making
Editing Forms:
- Test all changes thoroughly before uploading
- Verify forms work in dev/test environment
- Document any breaking changes or dependencies
Uploading Edited Files:
- Use exact same case ID as original upload
- Choose appropriate sub-destination (DONE is standard)
- Always notify Support via CRM when files are ready
- Don’t upload until you’re confident files are production-ready
Team Coordination
Support ↔ Forms Dev:
- Clear handoff via CRM at each stage
- Respond to notifications promptly
- Communicate any issues or delays
- Confirm understanding of requirements
Support ↔ Client:
- Advance notice of deployments (24-48 hours ideal)
- Confirm deployment windows align with client availability
- Follow up post-deployment for verification
- Document any issues in ticketing system
Related Documentation
- Process Flow Chart - Summarized steps with basic and swimlane flow diagrams
- Overview - Introduction to Form Exchange
- Troubleshooting - Common questions and solutions
This workflow ensures form updates are tested, approved, and deployed safely to production servers with full tracking and automated execution.